| Europa Gearshift Mechanism |
By Phil Ethier
Compiled from the Lotus Internet List and other sources
Here is a bunch of info on Europa gearshifts. The biggest problem, even on the five-speeds, is the meeting of the shift lever an the first tube. Wade through this stuff, and you will see the solution:
Subject: Help with Lotus gearchange
Dave Van Horn: I made more progress on the Europa frame last night. Removed the entire gearchange, speedometer cable, sway bar and lower front closing plate.
I think I have figured out the main problem with the gearchange. I will be putting in a heim joint to fix the problems with the departed rubber bushing on the top of the gearbox, thanks to Steve Valin's fine advice. But that is not the real problem.
95% of the guess-a-gear characteristic of this system is at the junction of the bottom end of the gear lever and the first horizontal tube that goes back. Without going into the rest of the linkage (trust me, Rube Goldberg would be proud), here is what this part does. The bottom of the lever is a simple tang with a hole in it. The tube has a clevis on the end. The lever tang fits in the clevis and a bolt (horizontal and across the car) goes through them both. The tube moves back and forth (end movement) to move from neutral into the gears. This works just fine.
As the lever is moved side-to-side, the front of the tube moves side-to-side. This motion is (and is supposed to be) irrelevant to the gearbox. The relevant motion is the ROTATION of the tube, which is supposed to move the selector from one gate to another. This tang-and-clevis is not up to it.
The problem: The clevis is supposed to have some spacer washers in it. They are not there. The whole assembly is worn, and the tang is bent. The result is that considerable sideways motion of the lever results in no rotation at all. Since there is a good locating spring in the gearbox, you always wind up in 3rd or 4th instead of 1st or 2nd. The locating spring for the reverse gate (reverse is next to 4th) is even stronger, so if you want to back up you get out and push. This actually makes sense, as at least you can SEE that way.
I believe that this is weak design point. Even if it is bought up to as-new spec, it will be inadequate. The present design relies on the fit of the tang in the clevis, and the whole contact area is only about 3/4" high. I think that this allows too much leverage advantage. I believe what is needed is a wider base.
The proposed solution: The lever could have the tang removed. A wide clevis, maybe 2.5" on the inside, can be welded in. Check the clearance to the coolant tubes on the right of the tunnel. For ease of assembly, a 5/16" Nylock nut could be spot-welded to the right side. There is room to weld in triangle gussets. The tube gets a 2.5" long tube welded across the end, with a 5/16" ID. This is also gusseted. After the tube is wrestled into the tunnel, the lever with suitable mounting flange is put in through the oval access hole and mounted. The tube is introduced to the clevis and a 5/16" bolt secures them. I have to be able to do this part with only my left hand. The 5/16" bolt should be a regular Grade 2, so it will be a wear part. I think that can be replaced from the passenger seat with the body on. Side-to-side play in the clevis should be irrelevant. Wear in the tube should not be a big factor. I would like to put a Zerk in it, but it is so hard to reach, I would find it hard to grease it anyway.
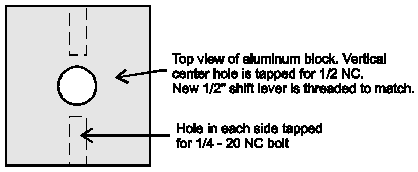
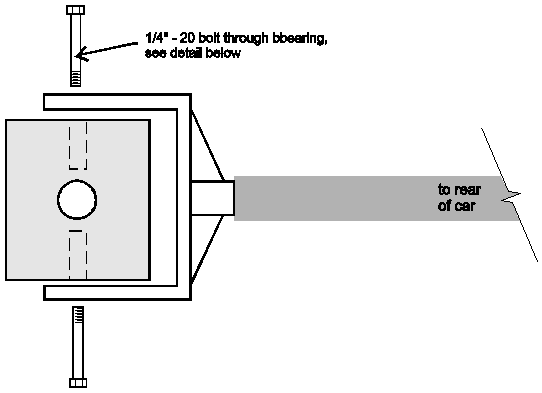
I put an aluminum block about 1.5" wide on the bottom of the shift lever. It has holes drilled and tapped for 1/4-20. I procured some ball bearing assemblies from the local surplus store.
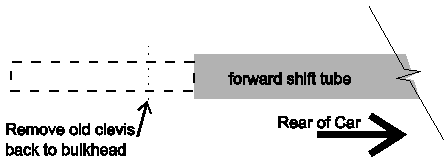
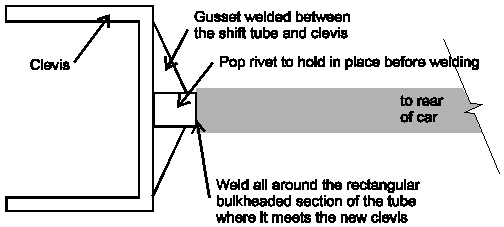
The shift tube has the clevis. After carefully measuring the location of the holes, I trimmed off the clevis ears, exposing a rectangular flat area on the end of the rod. I made up a U-shape of steel and drilled its ears to match the OD of the bearing assemblies. I pop-riveted the new clevis to the tube, then brought it and a 12-pack of pop to a professional welder. He welded it (which I may have been able to do) without wrecking it (which I am not so sure I could do) and welded on some reinforcement triangulation.
I placed my new clevis over my new aluminum tang and bolted in the bearings. Now I have a frictionless clevis with a MUCH wider base than the stock setup.
Tommy Schramm: Turns out Tommy actually did something I figured out independently. Toss out all the rubber mount stuff and the rubber ball on the shift stick. Just take a heim joint, cut off the threads and weld the ring to the bottom of the top shift-mount plate. Pass the stick through the heim joint.
Phil Ethier: The problem: The clevis is supposed to have some spacer washers in it. They are not there.
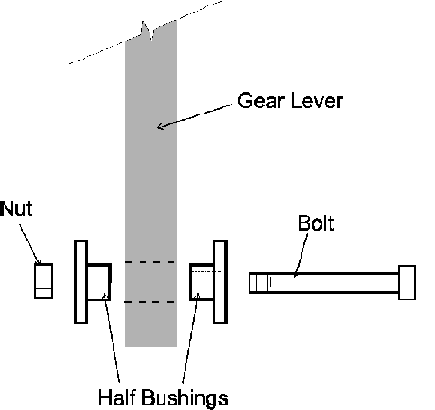
Dave Van Horn: They aren't supposed to be. It's not spacer washers that are missing; it's a pair of half bushings. They look like this (exploded view):
These half-bushings were originally rubber and over time they wear out, fall apart and disappear in the tunnel. The key to good shifting is to replace them. Unfortunately, they're NLA either from Lotus or from Ford (they were a Cortina part). However, I know someone who makes them up out of plastic (Nylon, I think; he tried Teflon but it was too soft). Replacing them with washers doesn't work very well; if you have enough to get good rotation, you get binding fore-and-aft as well.
Phil Ethier: The whole assembly is worn, and the tang is bent. The result is that considerable sideways motion of the lever results in no rotation at all. Since there is a good locating spring in the gearbox, you always wind up in 3rd or 4th instead of 1st or 2nd.
Dave Van Horn: This locating spring came in various strengths from the factory, who-knows-why. It appears to be based on what they had in the parts bin that day. If the tang is bent it appears you got one of the stronger ones, which put considerable strain on the linkage, notably the spot you were discussing. Fortunately the spring is easy to get to (it's on the gearbox) so you might consider cutting a loop or two off, or replacing it with a weaker one.
I waved your solution by my favorite Europa mechanic. He's the guy who makes up the plastic bushings. I can't remember all he said without having it here in front of me, but I suggest you call him - (503) 625-5443, ask for Jim. He runs a shop called Europa West and he's spent a ton of time tinkering with that linkage.
Phil Ethier: I got the gearchange spherical bush for only a few dollars from
Tri-State Bearing
612-721-2463
3418 E 25th Street
Minneapolis, MN 55406
Open Sat, 8-12
The late S2/ early TC had larger-diameter longitudinal shift tubes and a heavier lateral link with Heim (rose) joints. I am not convinced that these modifications addressed the real problems.
>After tweaking the linkage on my S2, moving the pivot point up 1.5 in. on the shift lever,
Did that. Actually made a new lever to replace the mangled stocker. The purists among you don't want to know how I made it, but I did it without machine tools.
>replacing the rubber ball pivot with a metal-to-metal spherical bearing
Got mine for about 3 dollars after being quoted $50 plus machining at other places. Check your local bearing places for a "self-aligning bearing".
>and machining a custom shoulder bolt for the lower pivot,
Tim did the best you could hope for with the original design, but the design there stinks.
>S2 with a more extensively modified linkage, and it's about as tight as you can get. Snick-snick. Like a toggle switch.
Thanks. It's nice to hear that the work is appreciated. I do not have the later, larger-tube S2 setup. I am not convinced it helps that much. There are three things I changed.
One: The rubber shift ball was toast. Tim is right a metal one is better. I was going to leave the pattern the same as stock, but ran into angle problems with the ball joint, so I made the bottom of the shift lever longer to shrink the pattern. I like the results, although some other folks (not Tim!) dislike the high effort.
Two: At the rear, where the lateral link attaches to the gearbox, Colin's lads used a rubber bushing. Steve Valin showed me how he put a Heim joint in there on an angle bracket. Solid.
Three: The Achilles' Heel of the system. Here is what I wrote about it when I was working on the car:
>If the problem is inside the transaxle, there isn't a big advantage between one or the other shifter mechanisms; however, they all share the same disadvantage... they're Renault. I've driven a LeCar, Fuego, Alliance, R-17, three S2 'ropas & four Twin Cams and they all felt the same. They shift in their own sweet time and won't be rushed. That's a side effect of the balk ring synchro and there isn't a whole lot you can do to effect a magnificient transformation. It never will shift like an Elan or Seven
Or that wonderful MG Midget box. Best shifter on the planet. My goal in the Europa rehab.
The French Revolution Pat Whale, Owner
(512) 453-5050
Jonathan Burnett, Master Mechanic
Austin, Texas.
They specialize in orphaned French cars.
P F Engineering
818-244-2498
4529 San Fernando Rd
Glendale CA
Renault specialist. Had a speedo angle-drive assembly for a 336 side- shifter trans sitting on the shelf when everyone else told me they didn't exist anymore.
Favorite saying: "Do you think the factory made this special tool just because they had nothing to do that day?" Sorry I can't do the French accent.
Jim Smeed
(503) 625-5443
Europa West
26464 SW McConnell Rd
Sherwood, OR 97140
Knows shifter tricks.
'I asked some time ago who Europa West was. I didn't recognize the name. However I do recognize the "owner". Be very careful dealing with this person. It is true that he knows a lot about Europas. However it is also true that he is difficult to deal with. I have also heard that the work quality is spotty. Some people are very happy with him and others hate him. This gets close to a religious issue at times. "I believe that it should be done this way." "No you're wrong my way is better." etc.' - overheard on the net.
I have figured out the main problem with the gearchange. I put in a heim joint to fix the problems with the departed rubber bushing on the top of the gearbox, thanks to Steve Valin's fine advice. But that is not the real problem.
View, from car left, of original shifter tube:
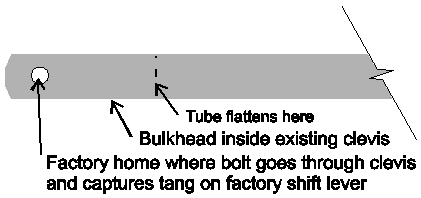
View from above:
Pop-rivet, then weld, the larger clevis to the bulkhead. Top view:
top view of the block and clevis as assembled
Enlarged top view of bearing area:
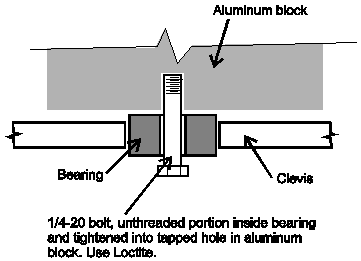
The inside race of the bearing is longer than the outside race, so the bearing does not bind on the block or the bolt head. Don't space the bearing any further from the block, as you don't want the clevis to slip inside it. The clevis will not fall off the outside of the bearing because the clevis will hit the block on the other side first.
Phil,
>I've got a question, can you remove the front-most shift tube without removing the motor?
On an S2, sure. Could be a problem on a Twink.
Remove the grille from the mouth at the front of the car. Remove the paper-board at the back of the nose cavity. There is a big rubber plug on the front of the chassis frame. Yank it out.
Go under the car, in front of the engine, and disassemble the rear of the front-most shift tube. If the bellows still exists, shove it into the chassis frame "box".
Go inside the cockpit. Remove the armrest on the top of the chassis frame "box". Stick your arm in the oval hole and remove the bolt that connects the shift lever to the front-most shift tube. Now remove the shift lever from the car by taking apart the four bolts which sandwich the shift-lever ball joint into the frame.
Pick up the now-loose front-most shift tube and move it forward until it fits through the holes in the front of the frame. Be careful not to catch the tee on the hole at the back of the frame. Get out of the car go to the nose cavity. Grab the front-most shift tube and guide it out of the chassis frame and on forward through the mouth.