| Europa Rear Swaybar |
By Kiyoshi Hamai
There are basically two choices for locating a rear sway bar on a Europa: a) Hang the bar behind the rear axle and low (below the transaxle); b) Hang the bar above and in front of the transaxle.
Placement Issues:
a) Bar behind and below transaxle - Biggest issue
is ground clearance. As it is on TC/Special Europas the gearshift
mechanism is in a vulnerable position. Imagine a sway bar hanging below
the transaxle in that area... It would scrape on driveways and such.
b) Bar above and in front of rear axle - Virtually
unobtrusive, neat, compact, but does put the weight of the bar higher in
the car.
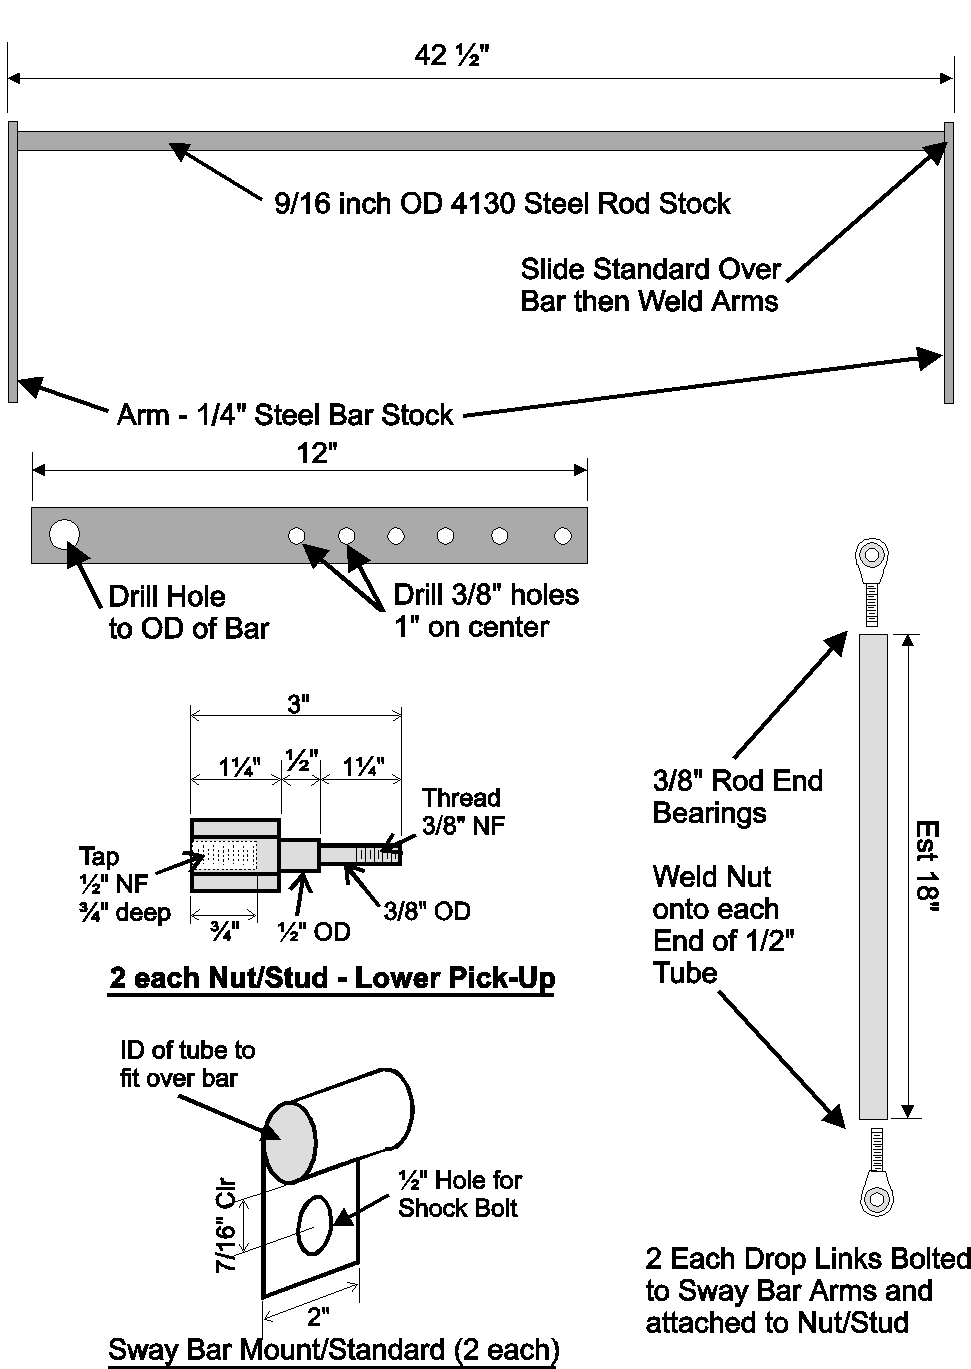
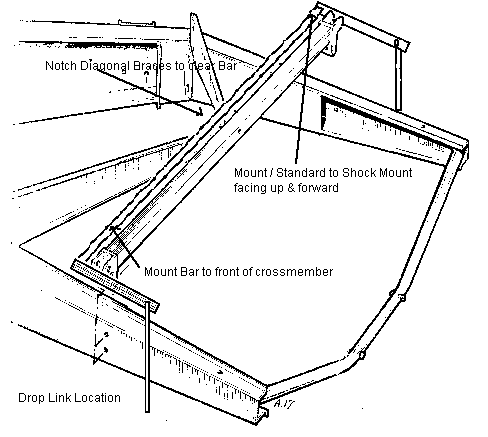
I chose the later - bar above and in front of the rear axle. I used mounting points that were already in existence. I used round 4130 bar stock 9/16" OD (assuming you are matching a stock 3/4" front bar). I don't recall the exact length of the bar, but it essentially paralleled the upper cross member (which the upper shock mounts are located) and reached just beyond the shock mounts on each end. This bar was straight - no bending. Hangers were fabricated, which consisted of a sleeve about 2 inches long and a flat plate welded to it. A 1/2" hole was drilled in the plate to mount the bar to the upper shock mounting bolt (on the front side of the cross member). You'll have to check the dimensions on the length of the mounting plate and the hole location. It needs to be long enough to clear the chassis (I believe the plates mounted so the bar was above the shock mounting bolts. Then I think some thicker pads were placed between the trunk and the cross member to clear the bar.)
To each end of the bar was welded an 11-12 inch X 1/4 inch thick flat bar stock (moment arm). On one end a hole was drilled 9/16 inch ID (same as the sway bar). The end of the sway bar passed through this hole and was welded in place (be sure the arms are in the same plane). At the other end of the arm holes (3/8 inch ID) were drilled at 1-inch increments beginning at 6 inches from the bar and going outward.
EUROPA REAR SWAY BAR COMPONENTS
Next, two studs were machined from 3/4-inch hex stock. Each stud was about 3-4 inches long. On one end of each stud a hole was drilled and tapped for 1/2 inch NF bolt (shock - lower arm pick-up on rear upright). The other end was turned down (be sure to leave enough metal between the end of the hole and this area). The inner most part of the stud was turned down to 1/2 inch (about 1/2 inch in length). The outer most part of the stud was turned down to 3/8 inch and then the end was NF threaded.
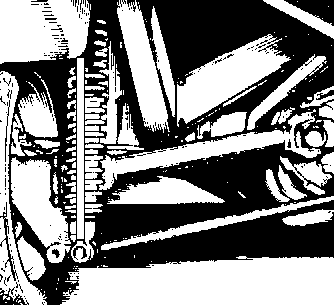
The bar was mounted and the studs replaced the mounting nut (I recall having to reverse the lower bolt so that the head of the bolt was now in front) on the lower pick-up bolt. I used a hiem joint (rod end bearing) 3/8 inch male and measured off the length of the drop link (from the arm of the sway bar down to the stud). The links were constructed of tube steel with at least a 3/8 inch ID and 3/8 inch NF nuts welded on each end to take the rod end bearings.
All of this was assembled. At the top the drop link was mounted to an 8 or 9 inch arm length. Moving the link to a shorter arm stiffened the sway bar.
SWAY BAR LOCATION
NUT/STUD REPLACES LOWER NUT

VIEW FROM REAR OF CAR INSTALLED SWAY BAR
This bar was first used by Dick Rasmussen (who now lives in Raliegh NC - but sold the car a few years ago). Dick took a SCCA Solo II National Championship in the car. The same bar, but with a thicker wire (5/8") is used by Scott McFall (who likes more oversteer) in his Europa and has won a number of Solo II Regional titles.