| Rear Disk Conversion on a Lotus Europa Twin Cam Special |
Jerry Rude 2/6/05
I've had trouble with the rear brakes on my Special since the car's refurbishment almost 5 years ago (has it been that long?). Here is a short list of the troubles:
I thought modern disks would alleviate many of these problems and Banks sells a kit which seemed easily duplicated. I really like to do little projects like this, so I slowly assembled the parts needed to duplicate Banks' setup. I waited until someone on ebay had a pair of re-built 89-90 Merkur Scorpio calipers for sale, and upon purchasing them and finding the stationary piece missing, had to wait until a Scorpio came in at our local pick-a-part junk yard.
For those who don't know the pick-a-part junkyards, they are a self service yard which allows the end user to remove the parts from cars which are made accessible by elevating them with old rims. The parts are cheap, but usually only cars from the eighties are found in these yards as you only get 100 bucks for any car when you "deposit" it in the yard. The parts are questionable, and buyer beware.
A friend from the Golden Gate Lotus Club, Scott Hogben, had done a similar conversion. His research led to a 92-01 Honda Integra rear disk. I purchased a pair from Kragens, but went one better by purchasing the cross-drilled and slotted street performance version. I bored the center of the disk out to the lotus register diameter of 2.875 inches (for the special only - S1,S2 & TC have a smaller diameter), and using the bolt pattern of the old drum and the same size drill as the drum's hole, I drilled the disk's holes out offset on the drill press. That was the only mods to the disks needed. Note that these disks are fully machined, so you can clamp them in a lathe easily to bore the centers. I believe Banks uses a Ford Sierra disk with a re-drilled bolt pattern and bored out center also. Unfortunately, I don't think these are available in the states.
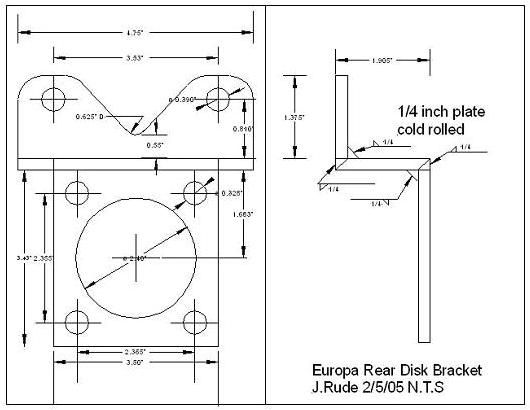
I then did a mockup utilizing a rear hub carrier and axle/hub from a Twin Cam (different backing plate hole pattern, but all the critical dimensions are the same as the TCS hub carrier). From that I built the brackets which are drawn below. The Banks system uses about 0.200 thick bent steel plate, so I used the closest I could find without weakening the system which is 0.250 thick steel plate. I also opted for the cold rolled material to gain some additional strength without any additional weight though it seems the cold rolled stuff is a bit pricey. I thought of using aluminum but without cutting it out of a large billet piece the loss of temper and strength when welding the pieces would have weakened it beyond what I thought safe.
The tricky part about building the brackets is keeping the surfaces for the caliper and the hub carrier parallel. Tack everything before final welding, and weld short sections at a time, alternating between sides and checking for parallel often. I drilled the caliper bolt holes undersized at first, for 3/8 bolts, and mocked everything up and filed the holes to the final dimension depending on where the caliper would sit in relation to the disk. I did this because the pads really fit the disk closely, and there isn't much room for error. I have also included a drawing of the Twin Cam hub carrier bolt pattern, which I believe is the same as the S2 pattern in case you have an earlier car.

After building the brackets, installation for the standard Europa is pretty simple. Remove the rear tires, drums, hubs, and backing plates. Install the bracket with 1/4 inch longer 5/16 NC bolts, I used steel grade 8 just incase and drilled the heads for lock wire. I put anti-seize on the bolts so I could remove them in the future and used lock washers, even though I lock wired all 4 of the bolts. I used blue loctite on the caliper bolts (both mounting bolts and sliding attachment bolts).
After installing the 12 inch AN-3 SS braided lines you have to make a small bracket to hold the interface between the flex line and the steel tubing. It has a 5/8 inch ID hole, and I pop riveted it to the trailing arm near where the parking brake used to attach. I also made the 3/16 hard line bend up to go over the parking brake cables as they rest on the trailing arm before bending up to go into the Merkur caliper cable hole.
The e-brake cable requires that you cut a 3/16" wide slit out of the caliper casting were the cable sheath is restrained. Also, the stock Europa parking brake cable pin is too large of diameter to fit the notch in the parking brake lever on the calipers. I turned down the pin slightly to make it fit, but you could also grind out the lever using a dremel tool with a small stone if you don't have a lathe to turn down the pin.
I used the EBC green pads, which interestingly turn black once they are heated up, as I have them installed in the front and have been happy with them on track days. They have good grip, and a low amount of brake dust.
After getting everything installed, I went out in front of the house and tried the brakes with cold tires, and a slightly sandy pavement section. The rears would lock up well before the standard front disks. I had the brake pipes swapped going into the M/C (stock is front tap to rear shoes, rear tap to front disks) so at first I thought this might be an issue. However, after looking closely at the cross section of the Girling style M/C, and after talking to a few others, I thought this unlikely to be the problem. But, just to be sure, I swapped the pipes to the original configuration and confirmed that there is no difference in brake performance and the forward piston in the M/C is only there as a safety item to isolate the circuits, and it doesn't affect the pressure of the circuit unless you lose the rear (M/C) circuit.
Knowing that I needed to reduce the rear line pressure, I hopped down to our local Lotus vendor (Dave Bean Engineering in this case) and purchased a Tilton Proportioning valve. After plumbing that into the rear brake circuit, I adjusted the rears to lock just after the fronts.
I noticed the parking brake hanging up a little upon release (when jacking up the rear of the car and trying to rotate the wheels). I attribute this to the old emergency brake cables which are worn pretty badly. I tried lubricating them, but that didn't seem to help much. I hope to purchase new cables when I drop by Bean in a month or so to see if that will cure the dragging problem (though I think it eventually releases far enough once the car bounces around a little on the road). If not, I'll have to install a helper spring between the cable end link and the sheath end.
For those with Corvair Axles
The caliper offset for the normal Europa and ones with the Corvair axles is the same (though the offset can be adjusted by
the thickness of the aluminum spacers between the hub and the rotor/drum on the Corvair system). So the bracket will fit
either, but a couple of things must be considered to fit this to the Corvair conversion. The bracket is about 0.150" thicker
than the backing plates so the grease seal on the outboard side must be thinner. I used a Chicago Rawhide No. 21670 which is
a 55x90x8mm seal. I reversed it, cut out bolt hole tabs by slicing away 4 sections of the outer rim, bending them flat and
drilling clearance holes for the carrier bolt circle. Make sure your holes have enough clearance so the seal can center
itself when you press the axles back in place. This reversing of the seal actually keeps the dirt out much better than the
normal configuration though it doesn't look quite as nice.
To install the disk conversion, you have to remove the whole trailing arm assembly. Fortunately the axle shafts can be disengaged on the outboard side and tied up out of the way. You need to press the yoke off (can use a puller). And then press out the axle shafts (I used press-on type bearings, but some may not - if not then you are fortunate as I bent one of the backing plates when removing the axles). When removing the axles, make sure you use a press, not a puller - you can damage the carriers (which are presently made of unobtainium I understand).
After you get the axles out, and the backing plates removed, you can bolt up the bracket and seal (loosely as you have to center the seal on the axle when pressing things together). When pressing the axles back in, (don't forget to RTV the trailing arm rear gap and the back of the new seal), you must do it carefully as the seal needs to be helped over the axle shaft seal surface "mid press". I used a 90 degree angled awl to lift the lip over onto the axle when it was close. Then, after the pressing on of the axle and yoke is done, you can tighten up the disk bracket bolts and lock wire them, and then put the trailing arm assemblies back on the car. Install the brake lines and the rest is obvious. If the calipers are not quite centered on the disk, you can space it out a bit using hardened washers on the mounting bolts for the caliper.
Materials
Tools (other than the usual wrenches etc.)
PHOTOS (click photo to enlarge)
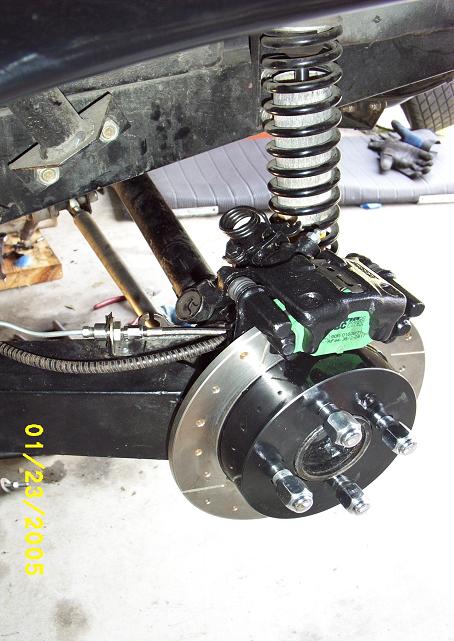
Here is the left side installed. Note that the parking brake cable is not in place yet on the caliper, but this gives a good
look at the bracket that holds the flex line/hard line in place, and how the hard line goes over the parking brake cable. I
later installed a clamp to hold the parking brake cable in place, so it wouldn't rub on the brake line. Unfortunately you lose
the pretty green color of the shoes once they get hot. Note also that this car has Corvair axles and the wheels have had
inserts installed in the wheel stud holes, necessitating the ET Mag type lug nuts. The wheels now center much better for balance.
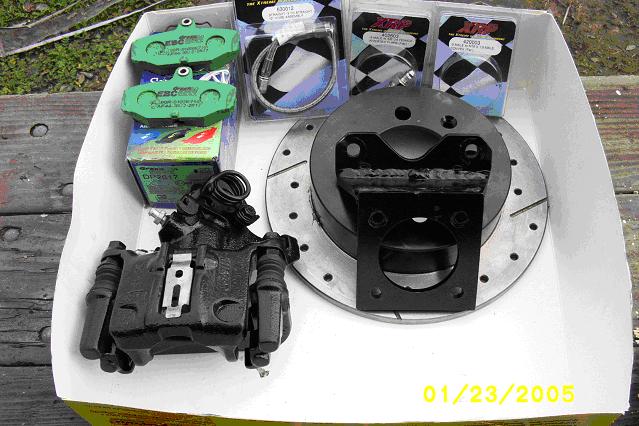
All the pieces for one side, in this case, the right one. Note the slightly elongated holes in the disk for the wheel studs.
The assembly weighs in at 10.5 lbs, compared to the 7 lbs for the stock drums. Not shown is the balance adjuster and piping.
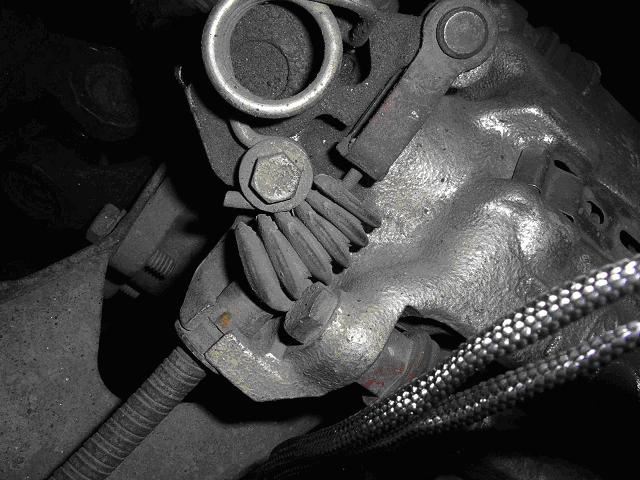
This shows the cut in the caliper where the Parking Brake Cable slips through. Photo courtesy of Tom O'Grady.
Special thanks to Tom O'Grady for sharing pictures and thoughts on his Banks kit, Scott Hogben on his own conversion, and all on the Europa Yahoogroups list in assembling all the data needed to make this a successful conversion.